Showing posts with label coconut. Show all posts

Wednesday, September 5, 2012

I'm back and it's Marathon Madness!

It's been a while and for that I apologise........but I have many awesome recipes to share with you as well as my trip back home to my motherland...the UK. I'm also training for my first marathon....so have been writing a lot of recipes and testing too....but trying not to eat the goodies myself!

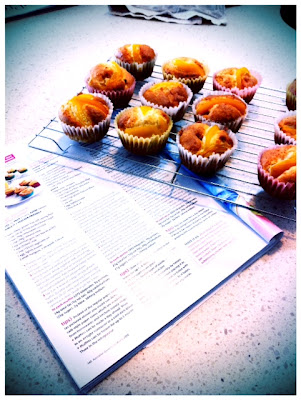
Where to start...well today I've whipped up a batch of gluten free muffins that I found in an old issue of Australian BBC Good Food Magazine. 


They are simply divine and so simple to make. I am heralding Healtherie's Gluten Free Baking mix as the best gluten free baking mix I have ever used...I've tried quite a few from the US Bob's Red Mill to the British organic Dove's farm. But hands down, this is impressive - just replace it as you would normal flour within a recipe and just make sure your baking powder is gluten free! Easy as that! Scroll down for the recipe...you won't be disappointed.


I also use it to make crumble toppings with some Gluten Free Oats I found in Waitrose in the UK - I wish that store was here - how I miss it so!


A friend asked me to make some 1st birthday cupcakes for a special little lady.... here they are.


I'll be back next week with a great new product that's just been launched in NZ supermarkets and I'll also tell you how to use it!

Have a great week! TPB X

MANGO, ALMOND & COCONUT MUFFINS


Makes 12-16

Prep 20 minutes
Cook 30 minutes

GLUTEN FREE

FREEZER FREINDLY

2 cups gluten free flour mix (Healtheries)

2/3 cup caster sugar
1/4 cup desiccated coconut
70g almond meal
1 cup trim milk
1/2 cup vegetable oil
1 egg, lightly beaten
2 small mangoes, 1 chopped, 1 sliced (I used 1 can mango slices in syrup and drained them)


  1. Preheat oven to 170 degrees celsius fan bake. Line a 12 hole muffin pan with cases.
  2. Combine all the dry ingredients in a bowl and stir well. Combine wet ingredients in a jug and whisk together lightly. Pour into bowl and stir until combined. Be careful not to over mix. Add the chopped mango and mix again.
  3. Pour into cases and layer with sliced mango on top. Place into oven for 25-30 minutes until golden brown on top. If desired, sprinkle with a little icing sugar when cooled.


HEALTHY FOOD GUIDE MAKE OVER MUESLI SLICE - JULY 2012 
http://www.healthyfood.co.nz


Makes 32 bars
Prep 15 minutes
Cook 20-25 minutes

FREEZER FRIENDLY 

Spray oil
3 cups rolled oats
½ cup sunflower seeds
¼ cup sesame seeds
¼ cup dried cranberries
¼ cup prunes, chopped
¼ cup linseeds
110g reduced fat spread
1 x 400g tin lite sweetened condensed milk
1 tablespoon light peanut butter
2 tablespoons runny honey


  1. Heat oven to 170°c. Grease and line a 30cm x 21cm bake tray. In a large bowl combine all dry ingredients and mix well to combine.
  2. Place a small heavy based pan on a low heat, melt the spread, condensed milk, peanut butter and honey. Carefully stir until melted, simmer for 1-2 minutes until it begins to thicken.
  3. Pour the melted mixture into the bowl on top of the oat mixture. Stir well until combined.
  4. Press into prepared tray and bake for 20-25 minutes until golden on top. Remove from oven and set aside to cool.
  5. Once cooled, remove from tray and using a sharp knife, cut into squares.

Variations
  • Banana & choc chip – add ½ cup extra oats to dry mixture. Once all is combined, fold through ½ cup mashed banana & 1/3 cup dark chocolate chips.
  • Fruit & nut – Replace sunflower and sesame seeds with chopped nuts and replace the prunes with sultanas.

What we changed from original full fat recipe from http://www.taste.com.au
  •      Swapped butter for reduced fat spread
  •      Reduced honey
  •      Reduced peanut butter
  •      Removed sugar
  •      Swapped toasted muesli for rolled oats


Tuesday, May 3, 2011

It's a little stunner...

Well I must start this week’s blog by saying….WAHOO! :) The reason for this is that my Feijoa and almond cake recipe was recently published in The Sunday Star Times newspaper, within Niki Bezzant’s column. They omitted my credit, so a nameless recipe but hey ho, that’s the way it goes sometimes! The recipe is in my second post of this blog and you can view it by following this link http://thepassionategroup.blogspot.com/2011/04/what-to-do-with-these-beautiful-green.html

This little stunner of a recipe made it into NZ's National Sunday paper
With the success of my feijoa cake in mind and a fruit bowl bursting with bananas, my latest creation is below. Try very, very hard not to cut into it straight away – I know the smell out of the oven is divine, but once cooled and iced you’ll be really glad you waited. 


Enjoy. TPB X
Toasted coconut at its finest
COCONUT & BANANA CAKE WITH VANILLA BEAN FROSTING


100g butter, softened
100g caster sugar
2 eggs, lightly beaten
150g self raising flour
½ teaspoon baking soda
1 teaspoon ground cinnamon
¾ cup desiccated coconut
1 cup mashed banana
FROSTING


25g butter, softened
100g cream cheese
250g icing sugar
1 teaspoon vanilla extract
½ teaspoon vanilla bean paste (I use Equagold)


3 tablespoons shredded coconut, toasted (optional)


1. Heat oven to 180Oc, then grease and line a 19cm round cake tin. 
2. Combine the butter and sugar until creamy; add the eggs, flour and baking soda stirring well. Fold through the cinnamon, coconut and banana. Pour into prepared tin & place into oven for 4-50 minutes until golden brown on top and a skewer comes out clean. Place onto a wire rack to cool .
3. For the frosting. Beat the butter and cream cheese for a few minutes until well combined, slowly adding the icing sugar until desired thickness is required. Add the both the vanilla extract and paste, stir well and place into fridge to thicken a little.
4. Once the cake is completely cooled, ice and top with toasted coconut, sprinkles or whatever you fancy.


Thursday, April 28, 2011

A Royal Melting Moment....

Okay then, so it's the big day for an unsuspecting couple tomorrow and what better way to celebrate than with some delicious and delectable delights! 


If you can, use real vanilla extract in baking. It is a bit more expensive but you really will taste the difference when biting into the buttery crumb of a melting moment, or as they call them here in New Zealand.... a Yo-Yo.


VANILLA PINK MELTING MOMENTS 


This tasty recipe has been adapted from the Chelsea Sugar website. Thanks Chelsea!


250g butter, softened
1 teaspoon vanilla extract
1/2 cup icing sugar
3/4 cup cornflour
1 & 1/2 cups plain flour


1. Set the oven to fan bake 160oC, and line 2 trays with baking paper.
2. Cream butter, icing sugar and vanilla until light and fluffy. Add in sieved cornflour and flour. If using your hands, gather into a large ball and try not to handle the dough too much - the butter will start to melt.
3. Using a teaspoon and the palm of your hand, shape into small balls and line on the tray. Press down onto the balls with the back of a fork, denting them slightly.
4. Bake for 15-20 minutes until golden brown, set aside on a wire rack to cool.


PINK BUTTER CREAM ICING


50g butter, softened
3/4 cup icing sugar, sieved
A couple of drops of milk (may not be needed)
1 teaspoon vanilla extract
A couple of drops of red food colouring


1. Combine the butter and icing sugar until fluffy, add the vanilla, beat again then slowly add the red colouring until you have your desired colour. Remember to add it slowly, even if it doesn't look like much you can always add more but you can't remove it!
2. Using a palette or flat knife, spread one side of the biscuit base with the butter cream icing and top with a biscuit lid.
3. Roll sides of biscuit in pink sprinkles. Repeat until all biscuit bases are filled, topped and rolled.
4. Store in an airtight container for up to 3 days.


I also made these tasty morsels this afternoon - they go by the name of "Lime & Toasted Coconut" cupcakes. You can order them directly from The Passionate Baker by emailing rebecca@thepassionatebaker.co.nz 


I know you'd all love the recipe, but shhhh it's a secret - for now anyway. ;)


Enjoy the Royal Wedding!